How To Replace Lens In An SV505C Color Planetary Camera?

How To Replace Lens In An SV505C Color Planetary Camera?
The SV505C Color Planetary Camera is an exceptional device that should be a part of any passionate astronomer’s kit. It provides a range of features that will ensure the best viewing and shooting experience, whether it is lunar, solar, or planetary recordings. The camera has an incredible frame rate of 93 FPS at full resolution. More frames can also be captured simultaneously, much higher than small video recording devices. This makes it an excellent option for shooting during bad weather, which most professional cameras are not equipped for.
It is equipped with a color sensor, is highly sensitive near the infrared region, and possesses a signal-to-noise ratio in dark environments. This makes it excellent for capturing the surface details of all celestial bodies in the solar system, like Jupiter, Mars, and the moon. All of these details make buying this camera an absolute necessity. However, how exactly can you replace the lens in this camera? We will discuss exactly this in this article alongside lens compatibility.
Let’s dive in.
Lens Compatibility
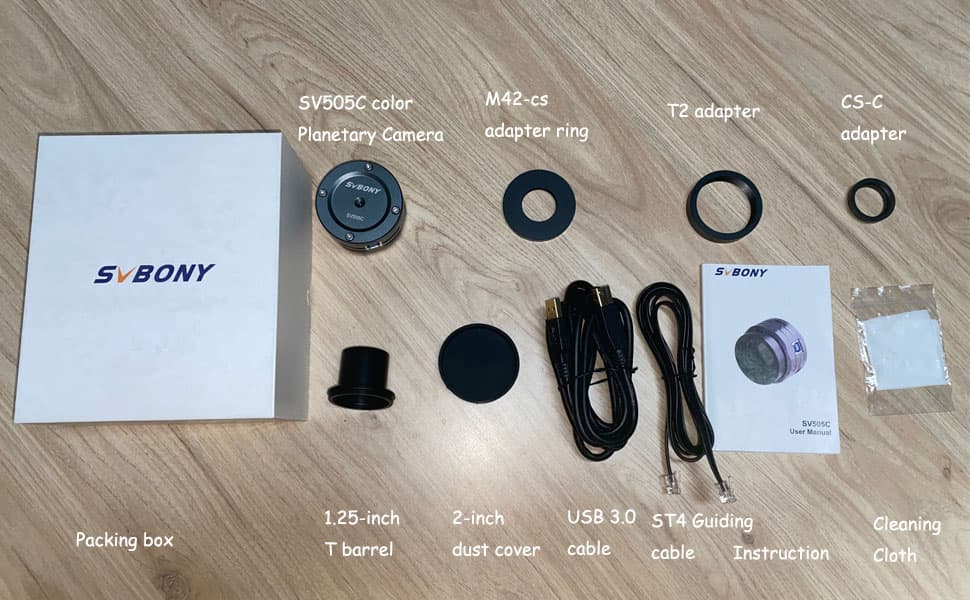
One great feature of the SV505C planetary camera is its compatibility with various lens types. It can work with both CS lens and CCTV camera lens, courtesy of the adapter rings that come with the camera. You can also connect 2X Barlow Lens and SV199 ADC. Each lens type will give you different fun results that you may want to try out, especially if you want to record some unique videos.
Furthermore, you can even connect the SV505C to your telescope to photograph and record over a wider area. However, even without attaching these lenses, the lenses already fitted into the camera are high-quality, courtesy of various components, like the SONY IMX464 color sensor. But how can you change and replace lenses in an SV505C color planetary camera? We will look at that next.
Replacement Precautions
Before you begin replacing the lens on the camera, you must take certain precautions. This is to ensure that the lens and camera within do not get exposed to the damage, dots, or dust that can affect your recording experience. For starters, you must ensure that the environment you are working in is clean to ensure that it does not get inside and contaminate the lens or components.
It is also a good idea to ensure less wind so turn off any fans or direct air conditioners. If you cannot control these wind conditions, ensure your back is to the wind. It is highly possible wind can blow in dust and dirt, which can be very annoying when it settles on the lenses or color sensor. It is recommended to wear gloves when you are working, as the oils on your fingerprints can easily smudge the lens. This will lead to a poorer recording quality when using the camera.
Replacement Procedure

The replacement procedure for the lens in the SV505C planetary camera is the following:
- Start by removing the dust cover and rear lens cap while gently holding down the camera.
- Remove the lens by pressing the mount button to ensure that it dismounts.
- If you are replacing the same type of lens, then you need to click it in place and mount it. Make sure you are careful so that the lens does not get smudged.
- If you are replacing it with a C lens, you must first attach the M42-CS Adapter, followed by the CS-C Adapter. After that, you attach the C lens.
- If you are replacing it with a CS lens, you will only need to connect the M42-CS Adapter. After that, you attach the CS lens.
- If you are replacing it with a 1.25’’ filter, you will need first to attach the T2 Adapter followed by the 1.25’’ T-Adapter. After that, you attach the 1.25’’ filter.
To sum up
The SV505C color planetary camera provides a range of features that make it the ideal camera for recording and shooting planetary, solar, and lunar views. The lenses are a crucial component of this camera, so you must understand everything about them. The camera is compatible with a range of different lenses, which includes CS lens, CCTV lens, and 2X Barlow Lens. There are certain procedures you should take, like working in a clean environment with gloves. This will ensure the lens is not smudged and prevents dust from settling on the sensor. We have looked at the replacement procedure for each lens, including the adapter rings you need to use.
We hope this article has been insightful and helps you replace the lens on your planetary color camera. Thank you for reading!


