

SVBONY SC311 Wifi Camera Review - First Light and Impressions
SVBONY SC311 Wifi Camera Review - First Light and Impressions
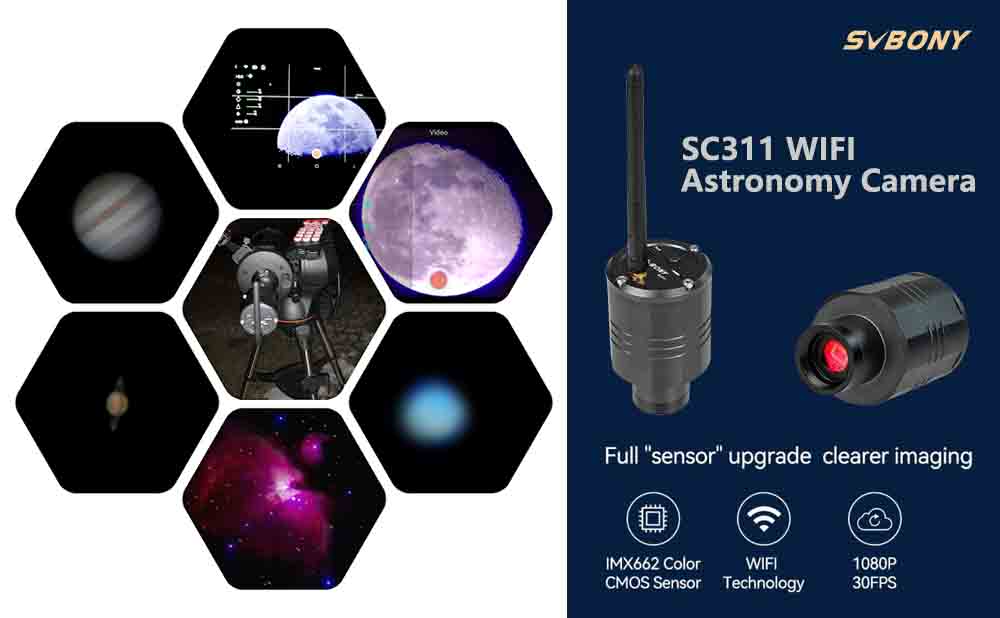
Greetings fellow astronomers. I am going to review the newest WiFi camera on the block from Svbony! The SC311 wireless astrophotography camera!. Svbony kindly sent me a pre-release version of this new camera for testing and review for full disclosure here. In light of that fact I do promise to perform a fair and balanced first light review of the good and not so good on this newly released wireless camera from Svbony.
You may ask well doesn't Svbony already have a WiFi wireless camera and the answer is yes they do and I did previously review it 2 years ago actually - the SC001 WiFi wireless spotting camera. This initial WiFi camera was designed for spotting scopes using it for nature viewing, spotting shooting targets, etc but was never designed for any Astro imaging in mind. Having said that it could capture some nice lunar and some bright DSOs like the Orion Nebula. Please feel free to read my first review of the SC001 wireless spotting camera here - SC001-Capturing the moon and more.
Introduction to the new SC311 WiFi camera:
The SC311 WiFi astro camera is a evolution of the older SC001 spotting camera with a multiple of new capturing capibilties as the sensor has been replaced by one of Sony's newest sensors the IMX662 sensor. This sensor has the same pixel size and sensor size as the old one in the SC001 and with the same field of view. However the new sensor in the SC311 has a much higher sensitivity, a much lower noise floor, is backlit and uses a HCG mode making for much cleaner captures devoid of sensor noise with particularly clean captures at night. This camera also uses the same exact Sony sensor found in the Svbony's SV305C planetary camera and shares many of the same capabilities and improvements particularly for planetary and deep sky imaging.
In this firstlight review we will be taking a first look into the new SC311 wireless camera and some of it's new imaging capabilties. We will explore the SC311's built in powerful wifi capabities, features and explore Svbony's new SvbonyAstro Android and IOS based app used with this camera (not to be confused with the older Svbony Cam app). Finally I will discuss the camera's strengths and some of it's shortcomings and some possible improvements that should be made. Indeed some of these features may already be in development with the Svbony development group as some of them have been already communcated to them. As with also new products there is always room for improvement no product is perfect.
The SC311 WiFi camera is designed to now be able to capture planets and deep sky objects (DSO's) something the older SC001 spotting WiFi camera certainly could not do well at all not only because of the older sensor used but because of the automatic settings and lack of adjustment control. If you used the old SC001 camera with the Svbony Cam app to try to capture planets like Jupiter or Saturn these planets just showed up as featureless white blobs actually but not so with the new SC311 camera. The new dedicated SvbonyAstro app is used to fully control the SC311 wireless camera from your phone or tablet and allows for much more manual adjustments necessary and is a requirement for planetary and DSO imaging. Along with the camera's new imaging capabilities the built WiFi hotspot capabilities are particularly great combination for star parties, outreach events and education group gatherings due to its multicasting capabilities to multiple devices (the older SC001 was capable of this as well but not to the same extent).
The new Svbony SC311 WiFi camera is of course solid, well made and very robust camera and comes well packaged with several included accessories such a C-mount adapter for attaching lenses, a C type USB charging cable, and a included Micro SD card for storing all the images and videos on the wireless camera while in use capturing (see figure 1 below). Everything you need to get started. See the product link for what is included with this new camera I will not dive into much detail here since this basic information already available for review - .SC311 WiFi Astronomy Camera

Figure1: Svbony SC311 WiFi Camera and Included Accessories
I am going to test drive some of the new features of this new wireless camera such as it's unique WiFi hotspot sharing capability along with it's enhanced imaging capibilties to capture the Moon, some of the planets- Jupiter, Saturn, Uranus and some readily viewable deep sky targets. I will use the SC311 wirelessly to capture these targets, then transfer them wirelessly to my phone then move them to my computer and stack and process them. You read correctly there are no cables between the camera and my cellphone to capture all these targets! Of course we can also hook this new camera up via USB and use capture software like Sharpcap in the standard manner to use it but uses the standard windows UVC driver not a dedicated driver unfortunately. It would be great if Svbony created a dedicated driver for this camera to fully control with other capture software. Who know's maybe a future update? We will not dive into this in this review since it does not really add any value to using a tablet or phone alone with their dedicated SvbonyAstro app.
The newly developed SvbonyAstro app this camera uses for capturing (available for both Android and IOS devices) provides a "live" wireless view of what you are actually seeing and allows much more fine control over recording capture settings (like gain, exposure, color, contrast etc) - see figure 2. The app also allows you to transfer and store captures of what is being recorded by the WiFi camera to your own personal device such as your phone or tablet more on this later. There are 3 modes of recording operation - video, image, and plan photo-more all of these modes later. Enhancing this camera WiFi broadcasting capability with the app you can connect multiple devices at once to the camera! Basically the first one that connects to the camera controls the settings and recording etc while the other connected devices views what is being broadcasted very cool! See figure 3 below for a demonstration of this multicasting capability example between my 2 devices and what it actually looks like below. This is a pretty cool broadcasting and multicasting feature and is great for star parties, astronomy outreach events and group learning sessions, etc.

Figure 2: SybonyAstro App (avail on Android and IOS used for Imaging

Figure 3: Top device is controlling WiFi camera and bottom device is viewing mode only
Honestly just the idea of getting rid of another bulky cable connecting to my bulky laptop to my Astro camera outside in the pitch dark and the cold is pretty appealing to me in its own right actually. The ability in cold weather to initally setup my scope then goto to the Celestral target I want to capture, set up the exposure, gain and photo plan settings, see the target live on my phone or tablet. Then go inside were its warm and cozy then watch and view live on my phone as it takes my planned target captures is pretty appealing indeed!. This is possible since the range of this device is around 30 feet super nice and another great feature!
The new SvbonyAstro app is designed to be used either in a fully automatic setting (like the old SC001 app worked) or by full manual control to adjust the live captures in real time and this means you can now actually manually adjust the brightness, contrast, gain, exposure and many other settings something you could not do on the older SC001 camera and one of its biggest shortcomings actually. So how sensitive is this new camera on picking up low light and high/low contrast targets like planets such as Jupiter and dimmer nebulas under dark conditions? How well does this new camera from Svbony handle color, detail, exposure and good contrast? How flexible is it to program capture sessions? How does the unique WiFi capability work under real conditions including cold weather? I have here in Canada in pretty extreme conditions and right now is around -10C. Let's test it out and see.
To test the new SC311 wifi camera I will be using 2 telescopes - the 102mm Mak for lunar and planetary imaging due to its high focal length of 1325mm and my widefield Orion 80mm Goscope for deep sky and lunar imaging. With the 102mm Mak scope I will also perform some initial closeup lunar imaging on the Moon to start, then will perform planetary imaging on Jupiter, Saturn and Uranus and then will move onto deep sky imaging using the Orion 80mm widefield goscope on targets such as M42-The Orion Nebula, etc. All targets were tracked using my Celestron Alt Azimuth Nexstar mount for both scopes on the test targets (see figures 4 and 5).
Equipment Used:

Figure 4: Orion 80mm widefield goscope (350mm focal length)

Figure 5: Celestron 102mm Mak scope (1325mm focal length)
Planetary Imaging with the new Svbony SC311 WiFi camera
All images shown below were all captured in hazy seeing conditions here in western Canada in a bortle 8 sky (lots of light pollution as well in the city). Capture frames for planetary and the moon were 100 frames each each using the plan photo mode capturing JPG images (more on this later) instead of MPG4 video capturing (the std recording mode for planetary). I did not use MPG4 capturing on planetary imaging due to the bad artifacts occurring with the very high compression used in this video format used in this wireless camera (see figures 6 and 7 below of what one actually looks like done for testing and enlarged):

Figure 6 : Stacked capture of Jupiter using MP4 Video format (lots of artifacts especially edges!)

Figure 7 : Stacked capture of Saturn using MP4 Video format (a little better than Jupiter!)
Unfortunately there is no AVI or RAW formats available due to bandwidth restrictions using the 2.4G broadcasting frequency and multiuser connection sharing which would cause issues with this camera being overloaded actually. The Svbony development team is apparently looking into this possible capability with lossless or less compressed formats and very well may be introduced in a future via a app/firmware update or even a new dedicated enhanced single user app for this WiFi camera. Even through this camera uses a compressed video format this new WiFi camera is still be a vast improvement over the older SC001 WiFi camera as you could not image planets at all with it (they were just white blobs but you could capture the Moon well amazingly). Interestingly, MP4 on the SC311 works great for lunar imaging (the moon) and the captures of the moon below were done via MP4 video capturing to note. Everything else was performed via single stacked JPG image capturing using the photo plan mode (more on this later).
Capture of each planetary target was done using the 102mm Mak scope with a 2X Svbony Achromatic barlow attached to double the actual focal length. A 2X barlow is typically used with this type of scope for optimal focal length and pixel size focal ratio for optimal planetary imaging. I use this barlow with all my other planetary imaging on my other planetary cameras so this just makes sense to use it here as well with this wireless camera. Stacking after the planetary imaging sessions was performed using Astrosurface and then Registax was used for planetary sharpening and color balancing. The moon captures was performed with MP4 video on both scopes.
Here are some stacked lunar and planetary captures with the SC311 camera:
1. Lunar capture of the Moon:

Figure 8: The Moon captured on the Orion 80mm Goscope (alt of horizon 40 degrees)

Figure 9: The Moon captured on the 102mm Mak (alt horizon 30 degrees)
2. Mighty Jupiter:

Figure 10: Jupiter and 3 of its moons captured on the 102mm Mak (alt of horizon 45 degrees)

Figure 11: Jupiter captured and enlarged on the 102mm Mak (alt of horizon 45 degrees)
3. Mysterious Uranus:

Figure 12: Uranus captured on the 102mm Mak (alt of horizon 40 degrees)
Deep Sky Imaging with the new Svbony SC311 camera
So how well does this new WiFi camera fare with some deep sky imaging? Since I used my wide field Orion 80mm Goscope on my Celestron Nexstar mount which is a alt-az mount (not a equatorial one so does not handle rotation) I am limited to maybe 30 second captures max before star rotation becomes a problem. But this is ok since the exposure limit currently on this camera is to a 5 second exposure max. It would be nice if this camera had a bit higher exposure to at least 30 seconds. I have requested this improvement to Svbony and the developer is also looking at this enhancement. Not sure why it is set to only 5s since this is not a bandwidth process the exposure occurs on the camera itself maybe due to cpu processing bandwidth on the camera not sure why. So currently, this combination the widefield scope, the alt z Nexstar mount and the camera should be a good combination for testing. Keep in mind 5s is pretty short capture time for most dim deep sky captures. So we really only have 2 actual options here for testing deep sky. Up the gain to highest levels (70 to 100 percent) and perform capturing then stack the results. The other route is to take lots and lots of captures over a evening for stacking as this will improve the aount of data sky data captured and improve the signal to noise ratios on the targets.
Keep in mind this camera has a relatively small field of view compared to a full size astro deep sky camera so widefield images of large wide galaxies and large vast nebulas such as Andromeda, North American Nebula and the Pleides are just not possible through a telescope (but maybe possible with using a smaller c mount widefield lens not tested in this review). Still there are lots of smaller targets that will fit nicely in this camera's small sensor field of view. This camera is suitable for lots of star and globular clusters such as M3, M13 Hercules, M35, M36, M44, M53, etc. This camera is also suitable for imaging smaller planetary nebula such as M1 Crab Nebula, M27 Dumbbell Nebula, M42 Orion Nebula, M57 Ring Nebula etc. Galaxys such as Bodes Galaxy, Cigar galaxy, Black eye galaxy, M51 and M101 etc fit also fit nicely in its field of view.
How did I setup the captures with the new SvbonyAstro app?
Since this is a first light test and due to time constraints for my deep sky capturing I choose the first option discussed above - upping the gain to high levels and taking several captures but not lots and lots of captures over a long period of time. I did this approach so can take a multitude of several deep sky targets at various levels of difficulty to test the overall viability of this new camera with deep sky imaging. Not focusing as much of the best quality possible as I would have to do a full dedicated review focusing on one main deep sky target and taking many many captures over the night. Maybe in a future review I will do exactly this. But for now lets take the high gain and short number of exposures approach and see what comes out of it with this new camera. This approach also allows me to see how noisy the captures are at high gain stacked with this camera since the exposure is maxed out at 5s with only a few set of exposures.
Here is how I setup the capture test plan in the Svbony astro app:
1. Using the exposure slider I set the exposure for the planned capture on the DSO target.
2. I use the gain slider in the app to set the gain to 350 (75% gain).
3. I selected the plan photo window button in the app and set the planned captures to 100 for the DSO target (or planetary target) to be imaged (see figure 13 below).
4. I then ran the photo plan by pressing the big white round button seen below and let it execute on the DSO target centered in the scope view.
5. I executed this plan for each DSO target in each capture DSO set.
See below the screenshot example on how this is set this up in the SvbonyAstro app, M42 plan photo is shown as an specific example. Pretty slick actually this app feature and seems to work very well and super convienient. Works much like a DLSR camera intervalometer very cool. Once setup you can click the big white button and walk away with your handheld phone or tablet and walk away into your warm house (within 30 feet). Very nice feature!

Figure 13: Sample DSO target plan photo in SvbonyAstro app
Once all my plan dso target captures were done I proceeded to transfer the captures to my phone from the camera wirelessly so I can move them off for stacking and processing on my computer. If you click the bottom right icon on the app (see above very bottom right square icon with mountains and sun on it) it will take you to the transfer screen so you can transfer from the WiFi camera to your device being used (see figures 14 and 15 below):

Figure 14: The post preview screen in the SvbonyAstro app

Figures 15: The transfer function in the SvbonyAstro app
On the top right of the transfer view screen in the app is a select function and if you click it you can go through the captured images and individually select them one by one and then transfer them over to your device. This I admit is quite tedious and hope that Svbony implements at least a "Select all" function so you can just get them all at once then perhaps delete them all after transferred. This is definitely one area of improvement in the SvbonyAstro app I have already requested. The other improvement here that would be very useful is if for each photo plan capture sequence that these captures would be put into a folder instead of dumped as individual captures with the rest of the images much like Sharpcap does on a computer. In addition a text settings file would also be stored with the capture settings used in this folder as well. I have also requested this new feature to Svbony. This is a brand new app so it is understandable that it is basic but these features seem certainly very useful and necessary for more serious imaging sessions and for post processing.
Once transferred to my phone I uploaded the captures to my goggle drive from my phone and then moved them down from goggle drive to my computer for stacking and post processing. For this I used Astro surface 3 star alignment to perform the stacking on captured DSO's and performed the post processing using Siril to do color calibration, background extraction of light pollution and gradients in the sky and final image histogram stretching. Here are the results of my session with the SC311 on my deep sky targets imaging session for the night with the above stacking and post processing done.
4. M42 - The Orion Nebula:

Figure 16: M42 The Orion Nebula
5. M27 - The Ring Nebula:

Figure 17: M57 The Ring Nebula
Final impressions
So how well did the new Svbony SC311 WiFi camera work on capturing both planetary and deep sky images? Well you decide for yourself! With its multicasting ability this camera would be very useful teaching device indeed for star parties, outreach group sessions and group learning sessions. Of course this camera can also do nature and bird watching, target practice viewing and all the rest as well not explored here that is understated. The convenience of not having wires attached to your telescope and to a laptop outside cannot be overstated super convenient feature the cameras broadcasting abilities with great range. Being able to use it in my warm basement instead of freezing outside imaging was a wonderful experience and I loved this actually. The captures I took above were in western Canada in very cold temperatures and hazy cloudy skies I am sure under better sky conditions this camera may very well exceed your own expectations. You decide.
In my opinion, I think this camera really is of excellent value and I am sure many astronomers with better equipment than mine and under much better sky conditions and can get much better results out of this new WiFi camera from Svbony. There are no real competitors to this wifi astronomy camera since none really exist. This is a new frontier for Svbony to come out with such a interesting WiFi camera such as this. I hope you enjoyed this initial article on the new SC311 WiFi camera and its planetary and deep sky imaging capabilities. I hope with better seeing conditions and possible future improvement updates to provide a another future review of this camera. For all of you that are further interested in some unstacked captures and videos from this camera you can find them here Svbony SC311 Unedited Captures and stacked ones here Svbony SC311 WiFi Camera Captures Clear skies to you all!


