
Table of Contents
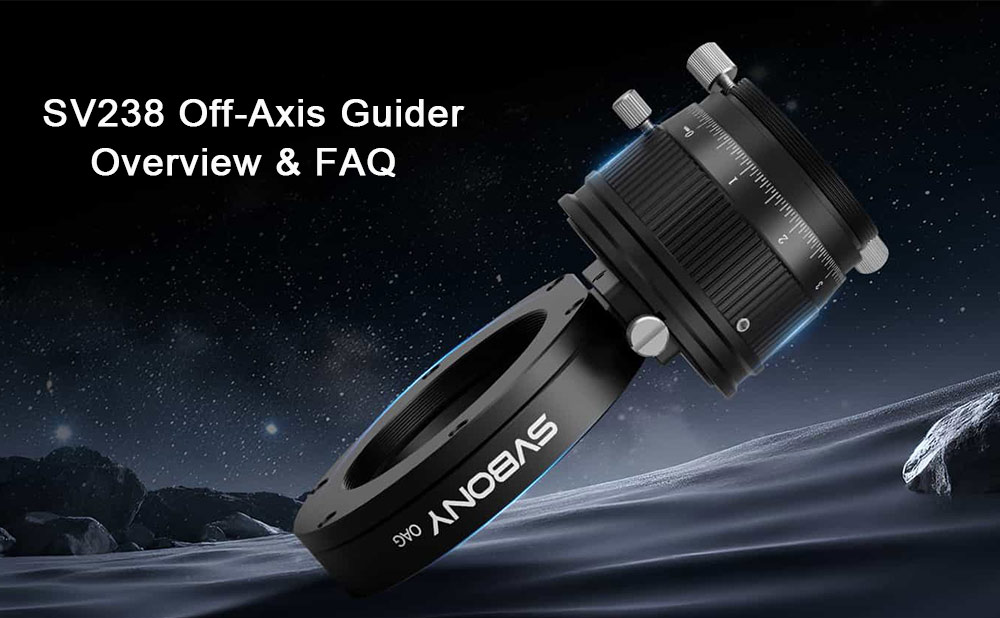
SV238 Off-Axis Guider Overview & FAQ
SV238 is a compact, rugged, and powerful Off-Axis Guider (OAG) that will elevate your autoguiding to a new level. It is an accessory designed to revolutionize your workflow for long-exposure autoguiding.
Three Types of Autoguiding Systems
There are primarily three main types of autoguiding systems used in deep-sky astrophotography rigs:
Guide Scope + Guide Camera
The classic guiding system consists of a guide scope and a guide camera, often the simplest and most economical solution.
Drawback: It requires an additional telescope. Using two separate optical tubes always carries a risk of flexure or differential shift between the main and guide scope axes. This is particularly problematic at long focal lengths, such as with Maksutov-Cassegrain telescopes, where such flexure can cause significant performance issues for the autoguiding system.
Off-Axis Guider (OAG) + Guide Camera
An OAG paired with a guide camera works by utilizing the same light beam that reaches the main camera. A small prism integrated into the OAG body diverts a portion of this beam to the guide camera. This eliminates the need for an auxiliary guide scope, thereby avoiding alignment problems caused by flexure between two optical axes. Furthermore, using an OAG system reduces the overall weight, size, and complexity of the setup by omitting the extra guide scope.
Dual-Sensor Camera
Using a dual-sensor camera eliminates the need for an additional guide scope or guide camera. This can be considered the most streamlined and advanced of the three options, as it integrates all necessary components into a single body. The downside is that such dual sensors are typically found only in high-end cameras. Therefore, unless budget is not a concern, an OAG like the SV238 represents the most cost-effective high-performance choice.
SV238 Key Points
Material & Construction
Manufactured from CNC-machined precision aluminum. This construction ensures a perfect thread fit, eliminating gaps between components, minimizing deformation, and delivering higher overall precision.
Helical Focuser (Standard)
Provides excellent precision for sharpening star images on the guide camera. It maintains the same field orientation even when rotating the focus ring, preventing camera rotation. This greatly simplifies operation, making manual focusing more comfortable and accurate compared to models without this feature.
Large-Format Prism
Small square prism systems are a common limitation of many OAGs, as they only intercept a tiny portion of the light cone from the main scope. Naturally, the smaller the prism, the more pronounced this issue. Conversely, an excessively large square prism can obstruct too much light from reaching the main sensor. Therefore, the ideal is to find a balance between prism size and shape-providing sufficient stars for the guide camera without excessive light loss. A key advantage of the SV238 is its 8×14 mm rectangular prism. This panoramic design avoids the prism dipping too far into the central light path while increasing surface area through lateral expansion. This is particularly beneficial for long focal lengths and environments with low star density, such as when using narrow-field telescopes like Maksutovs or Schmidt-Cassegrains, where finding a guide star can be challenging.
M42, M48, M54 Male Threads
Comes standard with M42, M48, and M54 male threads for connection to the telescope side. On the camera side, the SV238 features a screw-mounted attachment method, aligning with industry trends. Its standard mounting hole pattern is compatible with mainstream filter drawers/filter wheels.
Installation Method
Example using SV405CC deep-sky camera + SV226P filter drawer + SV238 OAG + SV905C guide camera + SV555 astrograph:
First, connect the filter drawer to the camera.
To facilitate adjusting the installation position of the SV238 based on the sensor location.
Camera flange distance: 6.5mm. Adapter ring thickness: 11mm. Total: 17.5mm.
Filter drawer thickness: 21mm.
Then, connect the SV238 to the back of the filter drawer.
Align the screw holes while ensuring the prism avoids the camera sensor.
Next, screw on the M48 adapter ring.
SV238 body thickness at this point: 16.5mm (including M48 adapter).

Connecting the telescope
Finally, connect the threaded side of the SV238 to the SV555 telescope.
Usage Results
Connect the SV905C guide camera to the computer, open PHD2, and confirm normal connection.
Then, connect the SV405CC main camera to the computer and open SharpCap to activate it.
Note: If both cameras are connected simultaneously before opening PHD2, the device selection in PHD2 may only show "SVBONY Camera" without distinguishing the model.
Click "Continuous Exposure". SharpCap displays the image from the SV405CC.
 PHD2 displays the image from the SV905C.
John Kolias's Review
We were pleased to have John Kolias evaluate our SV238. Here are his findings:
Dear Cindy and the SVBONY Team,
Thank you again for giving me the opportunity to test and review the SV238 Off-Axis Guider. I’ve spent time using it in real sessions and comparing it directly to two other OAGs I personally own-the ZWO OAG and the Celestron Off-Axis Guider. I want to share my honest thoughts and how the SV238 stacks up against the gear I already know well.
General Impression
Right away, the SV238 impressed me. The build quality feels solid and well-machined, and the overall design shows that a lot of thought went into making it practical for real astrophotography use. The large 8×14 mm prism is a standout feature - noticeably larger than many guiders in this price range - and it genuinely makes finding guide stars easier, especially on targets where the star field is sparse.
The dual helical focuser on the guide camera side is another big advantage. It allows for very precise focusing without the trial-and-error you often deal with on other guiders. Once I lock it in, it stays in place all night.
Setup & Usability
The SV238 was easy to incorporate into my imaging train. The thinner body helps keep the backfocus manageable, and the adjustability of the prism height means I can fine-tune the balance between guide star brightness and avoiding intrusion into the main camera’s field.
Once everything is dialed in, it is consistent. I can break down my setup and rebuild it without having to completely refocus the guide camera every time, which is a big plus for portable imaging.
Comparison With My Other OAGs
● SV238 vs. ZWO OAG
The ZWO OAG works well, but the smaller prism and thicker body often make it harder to find guide stars and harder to achieve perfect backfocus - especially when adding reducers or filter wheels. In practical use, the SV238 simply gives me more flexibility. I rarely have to rotate the OAG to find a guide star with the SV238, whereas with the ZWO I sometimes do.
● SV238 vs. Celestron OAG
The Celestron OAG is heavier, larger, and built for full-frame systems. It has its strengths, but for the type of imaging I do - mainly APS-C and smaller sensors - the SV238 gives me the reliability I want in a much more compact and user-friendly package. The Celestron unit performs well, but it can feel more than I need for most of my setups. The SV238 hits a more balanced middle ground.
Where the SV238 Stands Out
The larger prism makes guide star acquisition easier and more consistent.
The helical focuser is smooth, accurate, and much easier to work with than typical slide-adjust designs.
Its thinner profile helps with backfocus spacing in 55 mm imaging trains.
The overall build quality feels closer to high-end OAGs but at a much more affordable price point.
In real-world use, these small advantages add up and make the SV238 feel like the easiest and most dependable of the three.
Suggestions for Improvement
My only real suggestion is improving the documentation to make the setup even easier for new users. A few simple diagrams showing the OAG paired with:
a filter drawer,a filter wheel and popular camera setups,would help reduce confusion and let customers get the most out of the SV238 right away.
The hardware itself is strong - I think clearer visual guides would make the user experience even better.
Final Thoughts
After using all three guiders side-by-side, the SV238 is the one I would reach for first for most of my imaging setups. It has the right mix of features, build quality, ease of use, and value. It feels like it was made for the kind of practical astrophotography that a lot of people do, and it performs consistently once it’s set up.
Thank you again, Cindy, and everyone at SVBONY, for the opportunity to test this guider. If you need photos of my setup or examples from my imaging sessions, I’m more than happy to share them.
Sincerely,
John Kolias
Astronomy Party Vegas LLC
AstronomyPartyVegas.com
We sincerely thank John Kolias for his review and suggestions. In response, we have created this article with simplified diagrams and basic information on product compatibility and installation.
FAQ
Q1: What products is it compatible with?
A: It requires a filter drawer and we recommend the SV226P filter drawer (M42 interface, 21mm thickness).Compatible cameras include SV405CC/SV605CC cooled camera. Compatible telescopes include SV555, SV503 (with field flattener), SV550 (with field flattener), MK105 (with M42 adapter), and MK127 (with M42 adapter).
Q2: What are the thicknesses of the SV238 body and the M48/M54 adapters?
A: SV238 body thickness: 12.5mm. M48 adapter thickness: 4mm. M54 adapter thickness: 5mm. Therefore, total thickness with M48 adapter is 16.5mm; with M54 adapter, it's 17.5mm.
Q3: Which guide camera is recommended?
A: We recommend the SV905C guide camera.
Q4: What is the distance from the filter drawer mounting screw holes to the center?
A: 31mm. Q5: How to determine compatibility with other brand filter wheels or drawers?
A: 1. Check if the screw hole pattern matches (M2.5/M3).
2. Verify if the distance from screw holes to center matches (31mm).
3. Ensure the total thickness meets your backfocus (back focal distance) requirements.
Q6: What screw specifications are included for connecting the filter drawer?
A: M2.58 screws: 12 pcs (6 pre-installed on the product). M312 screws: 16 pcs.
Q7: How to adjust the relative position between the camera sensor and the SV238 prism?
A: The unit itself cannot be rotated. You need to loosen the mounting screws, adjust the locking screw positions, and then re-tighten.
Q8: Is the prism height adjustable?
A: Yes. Loosen the locking nut to raise or lower the prism to the desired position, then tighten the screw to secure it.
John
good