

How to Use SV112 to Work Well with Eyepiece?
How to Use SV112 to Work Well with Eyepiece?
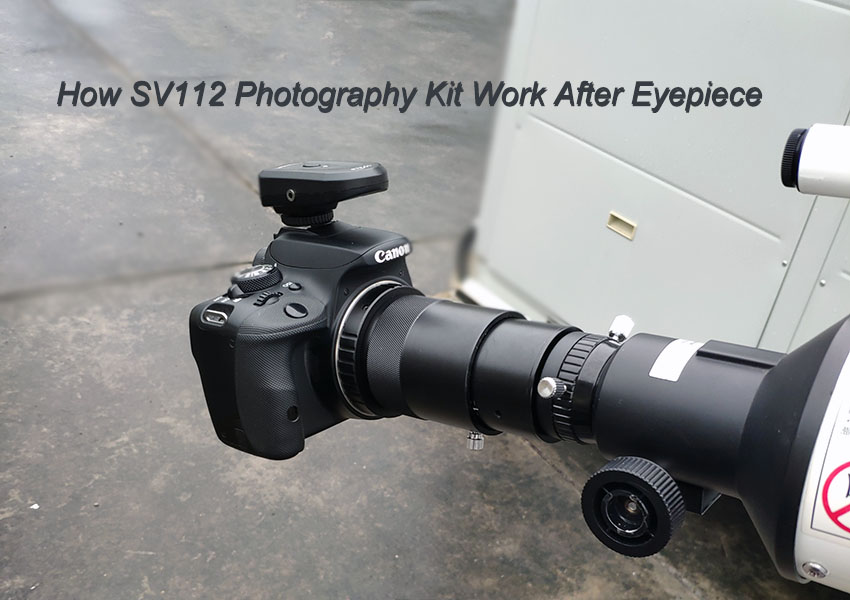
Hello everyone, Today I tested the Svbony SV112 Photography Kit with the SV25 60420 beginner Telescope. I connected the SV112 to Canon 600D camera, and in the other side, I input the 15mm 68 degree eyepiece, then connected to SV25 telescope. Let's see how it would be.

See what we have for the testing. (picture 1 upside) They are SV112 photography Kit (1.25” T-adapter for 1.25” telescope, a T-ring adapter for Canon camera, a parfocalizing ring for eyepiece using, and variable eyepiece projection adapter), the 68 degree 15mm eyepiece. all are showing in the upside picture.
Firstly, put the eyepiece into the eyepiece projection adapter and using the screw to fix it. in this step, you could remove the eye cup of the eyepiece. and take care of the eyepiece, slowly input it to the downside adapter. when find the correct position, use the screw to fix it. then connecting the upside adapter on to the downside part. Use the two screws to fix the upside adapter firmly. note the two grooves for the screws.
Secondly, screw on the 1.25" T-adapter for telescope to the downside adapter. ( see picture 2 following )
Thirdly, Connect the photography kit to the Canon camera by using the Camera adapter. if your camera has lens itself. you should remove the lens first. then screw on the T-ring adapter with M42 thread for Canon camera. the photography kit upside adapter also has M42 thread. then the camera parts are finished.
Forthly. input the 1.25" T-adapter into the 1.25" telescope focus hole, and fix it firmly with the 2 screws on the focuser. the setting up is done. you could turn on your camera and take some pictures now. (see picture 3 following)

Turn on the camera, what is showing on the screen maybe not a clear image. Adjust the telescope focuser slowly, you will see the image changing clearly on your camera screen. find the most clear image, and stop adjust the telescope focuser. you could take photos on the camera now.
My target is about 200 meters outside the window. I could see the trees clearly in front of the high school. The Chinese characters scrolling above the school gate are also very clear. See the following pictures I took with my smartphone. One bad thing, when put the images here with the width of 800 pixel. the clarity is reduced a lot. As I want to take photos with the Canon camera, I am not good at using camera, and the wind outside becoming heavily. 420mm telescope focal length, and 15mm eyepiece focal length. the 28x magnification power of the wave length of the wind. I didn't get a clear image with the camera. I am sorry. But you could see the clear image on the camera screen. and this is only the first test of it. I will try it again for capture the moon in the evening. Then I could share more pictures.

If you have any questions about using the SV112 photography kit, welcome all your comment in the following. we will reply to you in time. And welcome to share pictures or any ideas with us!

You will be happy that I have written review of sv48 on my blog https://astrobalcony.com