MK105---How to Collimate Your Telescope?

MK105---How to Collimate Your Telescope?
Collimating is the process of aligning a telescope’s optics. Do not attempt to adjust the collimation screws, if you have not read through this manual and are ready to do the collimation. The telescope will be strictly calibrated before it is sold. This operation is just to prevent accidents.
Make sure that it is actually out of collimation by a star test before adjusting the primary mirror of your telescope. Choose an appropriate time for the test, Take out your binoculars on a clear evening and let him acclimate to the outside temperature first, this should take 30-60 minutes. When it gets dark, aim your telescope at the stars, and slowly de-focus the image with the focusing knob. If the telescope is collimated correctly, the expanding disk should be a circle. If the image is unsymmetrical, the scope is out of collimation. It is critical to keep the star centered, so over time you will need to make slight corrections to the telescope’s position.
Start to Collimating
You should do it indoors, and with the telescope pointed at a white wall in a well-lit room. Remove the dust cover from the front of the tube, and the diagonal and eyepiece,look into rear opening of the tube. Try to keep your eye centered with respect to the rear opening of the tube by using a collimating eyepiece. If you don't have a collimating eyepiece, it doesn't matter. you can do it,too.
Once you are ready for all the things, check the rear opening of the tube. If the results like the one shown in Figure 1, then the telescope is probably out of alignment. A properly collimated scope will resemble Figure 2
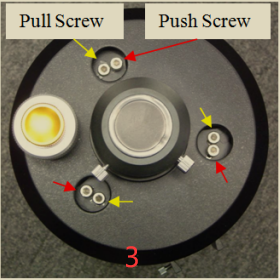
Remove three plastic screw covers on the rear cell of the optical tube. There are 3 sets of hex head screws. Every set of screws includes a push screw and a pull screw, as indicated in Figure 3. These alignment screws push and pull the mirror cell in order to tilt it. When you loosen or tighten one of these screws, the other five screws must be adjusted as well to keep the proper amount of pressure on the back of the mirror cell. By making slight adjustments, no more than a ¼ turn, to how much the screws are tightened and loosened, you will change the alignment of the primary lens.
If the view in your telescope resembled Figure 1, then you need to move the front opening of the telescope scope to the right. The alignment screw you would start with would be the screw on the right as shown in Figure 3. Before starting working on the screws, check if any of them is loose, especially the push screws. Your choice depends on whether this alignment screw is a push or pull screw. Please note that you will be working to adjust the mirror cell by keeping all the screws not too loose or too tight. You should better to follow the steps listed below carefully and refer to the figures that accompany them.

PS:There are three sets of alignment screw. Each set includes a push screw and a pull screw, indicated by red and yellow arrows, respectively. The push screwsstand out higher from the surface than the pull screws.

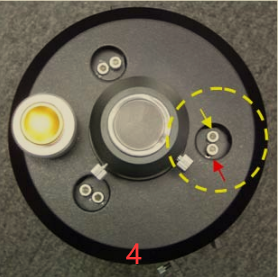
PS:If the view through the rear opening of the telescope resembled Figure 1, then the alignment screw set you would start with would be this set of screws marked by dashed yellow circle. The actual set of alignment screw you would pick will vary depending on which way the front opening would need to move in order to “fill” the black crescent.
Must to notice that the push or pull screw should be turned only a small amount, NO MORE THAN ¼ TURN each time,If the alignment screw is a push screw (need pushing the mirror inward)so you need to proceed carefully.

Firstly, turn the pull screw counterclockwise a small amount, no more than a ¼ turn (5.1).
Secondly, turn the push screw in the same set (5.2) less than ¼ turn.
Thirdly, locate the push crews in the other two screw sets (5.3) and turn them counterclockwise less than ¼ turn.
Next,turn the two pull screws in these two sets (5.4) clockwise no more than ¼ turn.
Repeat the above steps until the front opening is centered in the direction you wanted it to go. You may need to repeat this (or the pull screw adjustment process) with other screws in order to
align it in other directions.
The above is basically the steps of calibration, after you finish, you need to check again.If all is well no readjustment is required. This may still be a complication for newbies, hope your telescopes are all good! MK105


