How to use Cheshire Eyepiece

How to use Cheshire Eyepiece
Basic ideas:
- Adjusting the focuser to perpendicular to the axis of the tube of the telescope. (default setting)
- Adjusting the secondary mirror to be on the axis of the tube of the telescope. (default setting)
- Adjusting the secondary mirror to be directly below the focuser. (Adjusting by the middle screw on the second mirror which is not recommended to adjust frequently unless under certain circumstances.)
- Adjusting the direction of the secondary mirror so that the optical axis of the eyepiece points to the center of the primary mirror after being reflected by the secondary mirror. (with the help of a calibrator)
- Adjusting the direction of the primary mirror so that its optical axis coincides with the optical axis of the eyepiece (with the help of a calibrator)
Some preparations:
- Make sure the optical center of the secondary mirror fall on the central axis of the tube of the telescope: Use a ruler to measure and adjust the four rods connecting the pillar of the secondary mirror and the tube as accurately as possible so that the central axis of the pillar coincides with the central axis of the tube.)
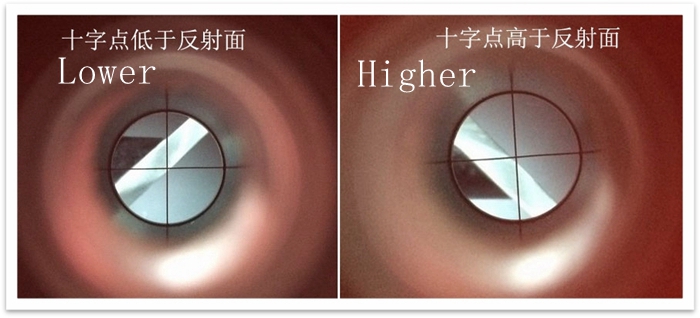
- Make sure the optical center of the secondary mirror fall on the central axis of the eyepiece tube: a). loosen three screws on the secondary mirror so that the mirror could rotate freely along the central axis of the pillar. b). Insert a Cheshire collimating eyepiece into the eyepiece tube, pull the focuser to the maximum, and rotate the secondarymirror90 degrees left and right to make the reflection plane of mirror is parallel to the optical axis of the eyepiece. Seen from the Cheshire, as the rotation angle reaches 90 degrees, the reflection plane of the secondary mirror just changes from "plane" to "line". c). Observe the position between the center of the cross line and the reflection plane of the mirror from the Cheshire, rotate the secondary mirror 90 degrees left and right. Adjusting the position of the secondary mirror through the screws until the center of the reticle is lower than the reflective surface and higher than the reflective surface separately when the mirror is rotated 90 degrees left and right. for example, -90 degrees, The center of the reticle is higher than the reflecting surface. When +90 degrees, the center of the reticle is lower than the reflecting surface, and the distance is basically the same, then the center of the reticle can be considered that it just falls on the center of the secondary mirror when the secondary mirror is at 0 degrees, which also means that the optical center of the secondary mirror falls on the central axis of the eyepiece tube.

Detailed steps:
- Coarse adjustment to the angle of the secondary mirror: there are four spokes connecting the secondary mirror to the tube forming a crosshair. One of the lines in the crosshair can be considered to fall on the plane formed by the central axis of the tube and the central axis of the eyepiece tube, and it’s also parallel to the central axis of the eyepiece tube. When the secondary mirror in its position, you can get the image of this line that cuts the secondary mirror from the middle and pass through the central ring of the primary mirror. How we gonna do that? Rotate the secondary mirror by hand along the axis of the secondary mirror pillar to the right angle. During this process, the image of the line (the spoke) observed from the eyepiece appears in the secondary mirror and continues to rotate until the secondary mirror is cut in the middle and the line passes through the central ring on the primary mirror.
- Fine adjustment to the secondary mirror: adjusting the central ring on the primary mirror to the center of the reticle of the Cheshire by three tilt screws.
- Adjustment to the Primary mirror: first, loosen the three locking screws at the bottom of the main lens, observe from the calibration eyepiece, adjust the three calibration screws at the bottom of the main lens, and adjust the peephole image (a black dot) of the calibration eyepiece to the center mark circle of the main lens and the cross of the eyepiece. If the center of the line coincides, tighten the three locking screws at the bottom of the main mirror.

For more info, click here.


